This post is the end result of a bunch of running around to repair the two idler pulleys and tensioner pulley on my 2005 Avalon XL. There was a squeak in the belt area when the car was in gear. It was more prevalent when the AC was on too. I had the car in for the brake recall (4th or 5th recall on this car!) and asked them to look at the squeak as well and let me know what they find.
Toyota said the squeak was coming from the two idler pulleys. They needed to be replaced along with the serpentine drive belt for a cost of $429.95. What!! Two little $10 bearings and a $25-$50 belt plus $340 in labor, if my math is right. Of course, they don’t replace the bearings, they replace the pulley. The pulleys are priced at $78 each. I didn’t price the belt but you see where the math is going. Toyota’s quote is nothing short of a rip off.
I proceeded to replace the bearings in the pulleys with generic bearings you can buy all day long from NAPA, Motion Industries, or wherever you choose. Further, I found that the belt tensioner pulley bearing was the worst of the three so I removed it and proceeded to repair it as well. Below is what I did to try to repair these three pulleys. This may be applicable to other vehicles (i.e. Camry) that use the same engine.
Step 1: Raise the front of the car, remove the right front wheel, and remove the small plastic panel in the inner fender well. Simple enough.
Step 2: Using a 14mm boxed end wrench on the belt tensioner bolt, remove the serpentine drive belt. I used a double boxed wrench so I could slide a piece of pipe, maybe 12 inches long, over the end of the wrench to get more leverage. This is close quarters so a socket and ratchet won’t fit. The double boxed wrench accommodates the pipe better than a combination wrench. Getting the serpentine drive belt off is more of a task then you might expect. Routing it out of the car took some patience.
Step3: With the belt removed, remove all three pulleys. All three pulleys use 14mm bolts. Use a socket with ratchet or breaker bar or a standard combination wrench to remove the two idler pulleys, as you see fit.
The tensioner pulley is more of a challenge for two reasons. First are the close quarters discovered when removing the belt. Second is the fact the tensioner moves. The fact it moves isn’t an issue in getting the pulley off but it will be getting it back on. Again, I used a 14mm double boxed wrench and the pipe to remove the tensioner bolt. Note: The idler pulley bolts are standard so you turn counterclockwise to remove them. The tensioner pulley is left handed so you turn it clockwise to loosen it. You will see the “L” stamped on the end of the bolt once you remove it.
Step 4: Now that you have the pulleys in hand, press out the bearing however you choose. I used a socket, socket extension and a small sledge hammer. I placed the pulleys across the jaws of a vise and drove the bearings out relatively easily.
Step 5: To replace the idler pulley bearings proved a challenge. Why? Toyota used a proprietary bearing in the idler pulleys. It’s a Koyo bearing. The only number on it is 6302RMX, which Koyo confirmed is the part number for the seal and not the bearing itself. They were unable to provide an alternate bearing and said the bearing is likely made to Toyota’s spec for a particular application. Fair enough. I’ll look to other manufactures.
I was unable to locate a replacement bearing for idler pulleys. The bearing measurement is 42mm O.D., 10mm I.D. and 13MM wide for anyone that wants to pursue it further. I opted not to and here’s why.
Thanks to the wonderful people at Gates Rubber Co., they produce a replacement pulley for NAPA (NAPA pt# 36173; Gates Pt# 7803-2273) that doesn’t suffer from Toyota’s proprietary engineering ineptitude. Gates used a standard 6203 bearing with a collared sleeve insert that steps a standard 6203 bearing, available everywhere, down to 10mm so it will fit the Toyota application. Note the original equipment bearing is a 6302 and the replacement is a 6203. The diameters are different. The NAPA/Gates repair part has a smaller bearing housing so it can accept the standard 6203 bearing that is also used in the tensioner pulley assembly. Standardization!! Neat stuff. Let’s see Toyota, I think it was Henry Ford that started standardization on the Model T? But I digress…
Understand, these idler pulleys turn three or more times the engine speed. They are not lubricated from the engine oil so they will fail again over time. However, the next time they fail, you can go to NAPA, Motion Industries, or wherever and buy a standard 6203 bearing and repair the pulley for $10. You simply reuse the collar that Gates provided with the NAPA replacement pulley. The NAPA replacement pulley is $42 but you’re set for the next repair. See pics that compare the Toyota bearing to the Gates/NAPA solution.
Pic 1
Pic 2
http://www.flickr.com/photos/2343932...7626102163975/
Step 6: Repair the tensioner pulley bearings. The tensioner uses standard sized 6203 bearings. Note the part number is very close to the original equipment part number used in the idler pulley. This is not a typo. The bearings are different so be careful. The original bearing part number is NSK 6203DUL1B.
There are also two bearings in this tensioner pulley. I purchased two SKF 62032RSJEM bearings from Motion Industries for $21. The design stacks two 6203 bearings and connects them using a single sleeve or bushing pressed through both centers. The “assembly” is then pressed into the pulley all at once. I used the socket and vice method in Step 4 to remove these bearings as well. I also used the same method to remove the bushing connecting the two bearings.
To assembly the bearings, I used the vise to press the bushing into one 6203 bearing and then also used the vise to press the second bearing onto the bushing. I would not recommend using the vice to press the assembly into the pulley. Why?
The bearing housing is recessed from the outer edge of the pulley. The vise will not apply pressure evenly to the circumference of the pulley when pressing the bearing which may result in a bent pulley. I placed the pulley on the smooth concrete garage floor and drove the bearing assembly into the pulley with a 30mm socket. However you choose to do this step, make sure you get the bearing assembly all the way in the bearing housing.
I wish I took a pic of the tensioner bearing assembly but I thought about it after I already reinstalled it on the car. My bad.
Step 7: Reinstall the pulleys. The idlers are pretty straight forward to install. The tensioner, once again, is tricky because it’s left handed and it now moves when you try to tighten it. To tighten it, I cut a piece of 1x4 lumber six inches long and 1 5/8 inches wide. I placed that piece of lumber between the tensioner pulley and the water pump pulley. Now, when I tightened the tensioner pulley by turning it counterclockwise, the piece of wood prevents the tensioner from moving more than a inch or so allowing it to be tightened.
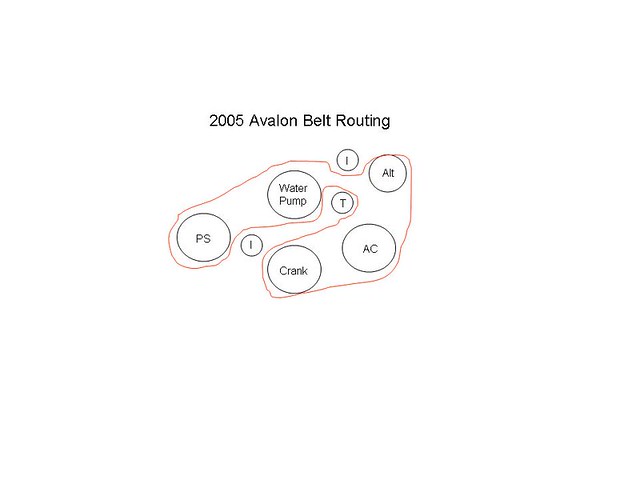
Step 8: Install a new serpentine belt. The belt routing is in the pic below. Sorry for the poor artwork but drawing a line freehanded in Powerpoint is not very easy to do!! I was unable to find this drawing anywhere on the web nor was it in my Toyota Owner’s Manual nor on a sticker under the hood, as it should be.
Putting this new belt on proved to be one of the more difficult tasks in the whole project. Keep your old belt in your trunk as a spare. Nobody seems to stock this belt so if you ever break one on the road, you’ll be glad you have a spare. Secondly, you won’t put this thing on sitting on the side of the road. You need a cool engine and a lot of patience to get this belt in there. But hey, you only have to do it every 60K miles so no big deal on the preventive maintenance side.
Step 9: Reinstall the plastic inner fender panel and wheel. BTW, this is a great time to check your steering rack boot or bellows and your CV joint boots or bellows while the wheel is off.
In closing, I will point out that Toyota replaces the entire tensioner as one assembly. Based on their design, the tensioner part is alone is over $200 but can be purchased in the aftermarket for about $120 or so. This is not an easy part to replace and requires the alternator and likely the AC compressor be removed to replace the tensioner. I can only wonder what Toyota’s labor rate is to replace the tensioner given the quote to replace the idler pulleys? My guess is it would be another $400 to replace the tensioner so I’d be out $800 in total to get all three pulleys replaced and a new belt. As it stands, I have about $120 in parts since I bought replacement idler pulleys from NAPA this go ‘round.
Two idler replacement pulleys $42 each
Two tensioner replacement bearings $10 each
One serpentine drive belt $25 from NAPA
Next time the pulleys bearings go out, and they will, I can repair all three for a total of $40 using four very common 6203 bearings. Hop
Reply 1 : 2005 Avalon Idler & Tensioner Pulley Repaired w/Generic Parts; Belt Routing
Thanks for posting that. After reading all that (and that's A LOT of words!), I'll take it to the dealer and have them deal with it. To me, it'd be worth it.
Sometimes it's not just about the money. But that's probably just me.
Reply 2 : 2005 Avalon Idler & Tensioner Pulley Repaired w/Generic Parts; Belt Routing
Your call. It's your money. $40 or $800+. Seems kind of easy to me.
Post is lengthy on purpose. Much of the info on this forum is not actionable. The intent here was to 1) provide info that isn't on the web elsewhere and 2) provide enough info to actually do the project for those that choose to do so. That takes some detail or you end up with "parts on the floor" calling a wrecker!!
Reply 3 : 2005 Avalon Idler & Tensioner Pulley Repaired w/Generic Parts; Belt Routing
Excellent post
 , going to need this sometime in the future.
This should be stickied at the top of this forum.
Reply 4 : 2005 Avalon Idler & Tensioner Pulley Repaired w/Generic Parts; Belt Routing
That's one hell of a comprehensive explanation! I salute your tenacity, I doubt I would have the time nor patience to science out exactly how to do the repair to enable future standard bearings to be used.
Nice work.
Reply 5 : 2005 Avalon Idler & Tensioner Pulley Repaired w/Generic Parts; Belt Routing
very good info 510, I'll subscribe to this just in case.
Reply 6 : 2005 Avalon Idler & Tensioner Pulley Repaired w/Generic Parts; Belt Routing
good info but sounds like a tough DIY (at least for me with limited knowledge/tools)
So how many miles do you have on your 05 when the belt/pulley went out?
No comments:
Post a Comment